Introduction to PC Compatibility
PC compatibility refers to the ability of different computer components to work together seamlessly within a single system. When building or upgrading a personal computer, understanding compatibility is essential to ensure that all parts function harmoniously and optimally. This includes the interaction between hardware components such as the motherboard, CPU, memory, storage devices, and graphics cards. Each part must support the others in terms of specifications and performance requirements.
The significance of PC compatibility cannot be overstated. Using incompatible components can lead to a range of issues, from failure to boot to persistent system crashes, and ultimately, diminished performance. For instance, selecting a CPU that is not supported by the motherboard or mismatching RAM specifications can result in wasted time and resources. Therefore, before making a purchase, it is advisable to consult compatibility charts, manufacturer guidelines, and community forums to confirm that the selected parts will align correctly.
Additionally, the rise of modular PC building has made the landscape of component compatibility more intricate. With many brands offering their own lines of components, the chances of selecting parts that do not communicate effectively with one another increase. Understanding the nuances of compatibility not only ensures that a computer will operate efficiently but also contributes to prolonging its lifespan. A well-matched system can perform tasks more effectively, enhance productivity, and provide an overall smoother user experience.
Understanding PC Components
A personal computer (PC) consists of several key components, each performing specific functions that contribute to the overall performance and functionality of the system. Understanding these components is essential for anyone looking to build or upgrade a PC, as compatibility between parts is crucial for optimal operation.
The Central Processing Unit (CPU) serves as the brain of the computer, executing instructions and processing data from various sources. It is essential to select a CPU compatible with the motherboard, as different sockets and chipsets will dictate this compatibility.
The motherboard acts as the main circuit board, connecting all components of the PC. It houses the CPU, RAM slots, and provides slots for graphics and other peripherals. The choice of motherboard can affect not only the components that can be installed but also the performance capabilities, especially in terms of overclocking and expansion options.
Random Access Memory (RAM) is crucial for providing fast access to data that the CPU needs for processing tasks. RAM comes in various types and speeds, which can influence system performance. Having adequate and compatible RAM is necessary for smooth multitasking and application performance.
The Graphics Processing Unit (GPU) is responsible for rendering images, videos, and animations. For gamers and professionals working with graphic-intensive applications, the GPU is a vital component, and ensuring compatibility with the motherboard and power supply is essential for optimal performance.
Storage devices, including Hard Disk Drives (HDD) and Solid State Drives (SSD), provide the space for software, applications, and files. The interface type (SATA or NVMe) dictates compatibility with the motherboard, influencing speed and storage capacity options.
Lastly, the power supply unit (PSU) delivers electricity to all components. Sufficient wattage and appropriate connectors are necessary to ensure all parts receive the power they need to function correctly.
Key Compatibility Factors
When building a personal computer, ensuring that all components are compatible is crucial to achieving optimal performance. Several key compatibility factors must be considered, beginning with the socket types for CPUs and motherboards. Each processor model is designed to fit a specific motherboard socket. For instance, Intel’s LGA 1200 socket supports various 10th-generation CPUs, while AMD utilizes the AM4 socket for its Ryzen processors. This variation necessitates meticulous checking of the socket type to avoid mismatches.
Another vital aspect of compatibility is the RAM. The speed and size of the RAM should align with the motherboard’s specifications. Most modern motherboards list the supported RAM speeds, and utilizing modules that conform to these guidelines ensures stability. Additionally, the maximum RAM capacity supported by the motherboard must be reviewed. Installing RAM that exceeds this limit may lead to malfunction or failure to boot.
The GPU interface standards also play a significant role in overall compatibility. Modern graphics cards typically utilize the PCI Express (PCIe) interface, which varies in version and lanes. It is essential to ensure that the motherboard includes a compatible PCIe slot and can meet the bandwidth requirements of the GPU, particularly for gaming systems or other graphics-intensive applications.
Lastly, the power supply unit (PSU) must meet the power requirements of all components. Each part, from the CPU to the GPU, has a specific wattage requirement that contributes to the total system demand. It is advisable to choose a power supply with a slightly higher wattage than the combined needs of all components to allow for future upgrades and prevent power-related issues.

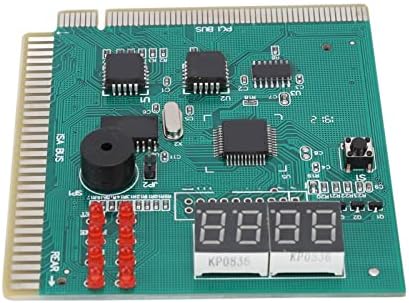
- PCI ISA INTERFACE: This PC diagnostic card adopts standard PCI and ISA interface, easy access to desktop PC.
- 4 DIGIT DISPLAY: This PC mother board adopts 4 digit display, the first 2 digits indicate the current error code, and th...
- STRONG COMPATIBILITY: This PC diagnostic 4 digit card is compatible with ny kind motherboards with the PCI and ISA bus s...
Using Compatibility Check Tools
With the increasing complexity of PC builds and the vast array of components available, ensuring that all parts work seamlessly together is essential. Compatibility check tools are invaluable resources for builders looking to optimize their configurations. These tools enable users to input selected components, and they analyze the compatibility of each part, thereby preventing potential issues and enhancing performance.
One of the most popular types of compatibility check tools is online configurators. Websites such as PCPartPicker and Newegg's build tools allow users to assemble a virtual list of components. These platforms not only assess the compatibility of parts like CPUs, motherboards, RAM, and graphics cards but also provide information on power supply requirements and cooling solutions. They feature community-driven insights, highlighting user reviews on which parts work well together, along with potential pitfalls.
In addition to online resources, downloadable software tools such as PC Building Simulator offer a hands-on approach to understanding component compatibility in a virtual environment. Users can experiment with various parts and configurations, simulating the build process before actual assembly. This aids in identifying potential conflicts, such as power supply limitations or case size restrictions.
Moreover, user communities on forums like Reddit or Tom’s Hardware serve as excellent platforms for gathering experiential knowledge. Enthusiasts share their builds, offering insights on compatibility challenges they faced and how they resolved them. Such collective expertise can be invaluable for newcomers who may not be aware of specific nuances regarding compatibility.
Incorporating these compatibility check tools into the planning stage of a PC build can significantly reduce the risk of compatibility issues, enhancing overall efficiency and satisfaction with the final configuration.
Manual Compatibility Checks
When assembling a PC or upgrading components, ensuring compatibility among the various parts is paramount. The process of manual compatibility checks involves several steps that guarantee your selected components will function together optimally.
First, it is essential to check the manufacturer specifications for each component. This information is typically found on the manufacturer's website or in the user manuals provided with the parts. Components such as the motherboard, CPU, RAM, and GPU have specified requirements that dictate which other components can be paired with them. For example, the CPU socket type must match the motherboard socket, and the RAM must be compatible with the motherboard's supported memory types and speeds.
Next, reading product datasheets can offer deeper insights into component compatibility. These datasheets provide comprehensive details regarding technical specifications, power requirements, and thermal characteristics. For instance, a GPU may require a certain wattage from the power supply unit (PSU), and knowing this in advance prevents potential build issues. Additionally, checking the memory slots and supported memory configurations on the motherboard through its datasheet can offer clarity on how many sticks of RAM you can install and the maximum capacity.
Lastly, consulting expert communities and forums can prove invaluable. Websites dedicated to PC building often have discussions where users share their experiences with specific components' compatibility. These forums can shed light on unexpected compatibility issues or provide confirmation that certain setups function seamlessly together. Engaging with seasoned PC builders can lead to useful tips, easing the selection process and confirming your research.
Overall, thorough manual compatibility checks, including referencing manufacturer specifications, analyzing product datasheets, and participating in community discussions, are critical steps in ensuring your PC components work together perfectly.
- 【Easy Access】 - The PC Diagnostic Card is designed with standard PCI and ISA interfaces, providing effortless access to ...
- 【Four-Digit Display】 - Equipped with a clear 4-digit display, our diagnostic card takes the guesswork out of troubleshoo...
- 【Broad Compatibility】 - With its robust design, this PC Diagnostic 4 Digit Card is compatible with a wide array of mothe...
Common Compatibility Issues
Building a PC can be an exciting yet challenging endeavor, especially when it comes to ensuring that all components are compatible with one another. One of the primary compatibility issues that builders often encounter is mismatched socket types. Each CPU has a specific socket type, such as LGA 1151 or AM4, that corresponds with motherboard designs. If the CPU socket does not align with the motherboard socket type, the two components will simply not work together, rendering the build ineffective. Thus, it is essential to check the specifications of both the CPU and the motherboard before proceeding with a purchase.
Another frequent hurdle is an insufficient power supply wattage. Each hardware component has a certain energy requirement, and the power supply unit (PSU) must provide enough wattage to support all components, including the CPU, GPU, and any additional peripherals. A power supply that lacks the necessary wattage can lead to system instability or even hardware damage. Additionally, using a PSU with the right connectors is crucial, as modern graphics cards may require specific connectors that older models do not.
Lastly, incompatible RAM speeds can pose significant issues during the build process. Memory modules are available in various speeds, measured in MHz. Motherboards tend to have specified speeds for optimal performance. Using RAM with speeds that exceed or do not meet the motherboard specifications may result in the system defaulting to a lower speed than expected or not functioning entirely. To avoid these pitfalls, builders should diligently cross-check component compatibility by referencing the specifications of each part and employing PC compatibility checking tools, ensuring that their build meets all necessary requirements.
Future-Proofing Your Build
When building a PC, future-proofing is an essential consideration that can spare users from unnecessary upgrades or component replacements sooner than anticipated. A future-proof build ensures that your system can accommodate upgrades while maintaining optimal performance. To achieve this, it's crucial to make informed decisions regarding the selection of parts.
One of the first steps in future-proofing your PC is to opt for a motherboard that supports the latest chipsets and standards. This will provide you with the flexibility to upgrade your processor in the future without needing to replace the motherboard. Additionally, choosing a motherboard with multiple PCIe slots will allow for enhancements such as dedicated graphics cards or other expansion cards.
When it comes to storage solutions, selecting an SSD over a traditional hard drive is a superior choice, as SSDs offer faster performance and greater reliability. Installing an NVMe M.2 SSD can enhance speed significantly while leaving space for future storage upgrades. Furthermore, consider multi-drive setups with support for RAID configurations, which can improve both performance and redundancy.
Graphics are another critical component to future-proofing. Investing in a graphics card that is not only powerful enough to handle current software demands but also supports next-gen features such as Ray Tracing can extend the life of your system. Furthermore, ensure that your power supply unit (PSU) has adequate wattage for potential upgrades, including additional GPUs.
Finally, keep in mind that your RAM is also a pivotal factor in future-proofing. Opting for higher capacity DDR4 or DDR5 (if compatible) memory will give your build longevity as software requirements continue to evolve. By selecting components that offer compatibility and flexibility, you can create a PC build that is not only high-performing today but is also well-equipped for future advancements.

- [Essential PC Diagnostic Tool] Quickly verify power supply functionality with bright LED indicators to prevent component...
- [Comprehensive Voltage Checking] Tests all key outputs: +3.3V +5V +12V -5V -12V +5VSB. Works with 20/24-pin ATX PCIe HDD...
- [ Problem Detection] Clear LED display identifies missing voltages unstable rails or poor connections in seconds saving ...
Testing Your PC Build
Once you have completed the assembly of your custom PC, performing a series of tests is essential to ensure that all components are functioning harmoniously. The first step involves entering the BIOS setup, which serves as the firmware interface between your hardware and operating system. Accessing the BIOS during bootup allows you to verify that all hardware components, including the CPU, RAM, and storage devices, are recognized correctly. Ensure that the settings are configured properly, including the boot order and any necessary adjustments for overclocking.
Next, system stability tests should be conducted to evaluate how well your PC can handle extended workloads. Tools such as Prime95 or AIDA64 are commonly used for stress testing your CPU and RAM. These utilities will push your system to its limits, helping to identify any instability or overheating issues that could indicate hardware incompatibility or insufficient cooling solutions. It is advisable to monitor system temperatures closely during these tests to prevent thermal throttling or damage.
Performance benchmarks play a crucial role in assessing the overall compatibility and efficiency of your build. Applications like 3DMark for graphical performance, and Cinebench for CPU benchmarking, provide insights into how your components perform under typical usage conditions. By comparing your scores to baseline metrics for your specific hardware, you can gauge whether your build is operating within expected parameters. Observing the results of these tests will further confirm the synergistic compatibility of your selected parts.
In summary, thorough testing of your newly built PC is paramount for ensuring that all hardware works seamlessly together. By conducting BIOS checks, stability tests, and performance benchmarks, you can enjoy peace of mind in your custom PC's capabilities and reliability.

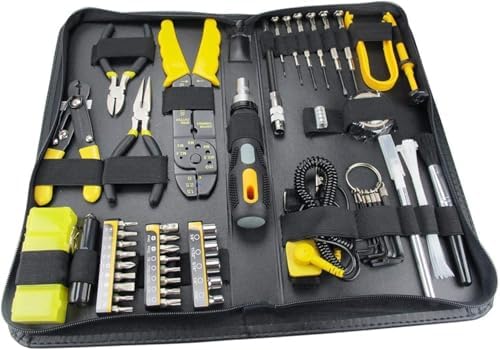
- 【Ergonomic Design and CRV Material】Frosted anti-slip pattern handle, easy and labor-saving. The screwdriver bits are mad...
- 【Precision Screwdriver Set】25-in-1 Multi-Function Screwdriver with 24 Bits, Phillips PH000, PH00, PH0,PH1, PH2, Torque T...
- 【Portable and Compact】 Each screwdriver bit is labeled with a model number for easy identification and is neatly arrange...
Conclusion and Next Steps
With the rapid advancement of technology, ensuring that the various components of your PC are compatible with one another is more critical than ever. The process of assembling or upgrading a computer can seem daunting, but by systematically checking the compatibility of each part, you can avoid common pitfalls that may lead to performance issues or system failures. Key elements to consider include the compatibility of the motherboard with the CPU, ensuring the correct power supply wattage, and confirming that the cooling system can adequately support your components.
As demonstrated throughout this blog post, a thorough understanding of compatibility can facilitate a smoother and more efficient PC building process. This not only saves you time and effort but also maximizes the performance of your new system. It is imperative to research each component, referencing technical specifications and compatibility lists where possible. Utilizing online tools such as build guides and compatibility checkers can also assist in this endeavor, providing you with a robust foundation upon which to build or upgrade your PC.
For those looking to deepen their knowledge of PC building, consider exploring online forums, instructional videos, and detailed articles from reputable technology websites. These resources can offer valuable insights into common compatibility issues as well as expert advice on best practices. Remember, a well-planned build not only enhances the user experience but also extends the longevity of your investment. Prioritize compatibility to ensure that your computer operates seamlessly and efficiently.


0 Comments